
hmm, i want share how search file in computer with Java Programming??, it's easy just coding here :
private javax.swing.JFileChooser browse;Save with name search.java . Finish!!!
private javax.swing.JButton browse_btn, search_btn, reset_btn;
private javax.swing.JTextField browse_text, search_text;
private javax.swing.JTextArea area_search;
private javax.swing.JScrollPane pane_area;
private PanelFind panel;
private java.util.concurrent.ExecutorService tread;
private java.io.File dir;
private String keyword;
private RunFind findNow;
public FindFiles(){
super(”FindFiles”);
browse = new javax.swing.JFileChooser(”.”);
browse.setAcceptAllFileFilterUsed(false);
browse.setFileSelectionMode(javax.swing.JFileChooser.DIRECTORIES_ONLY);
browse_btn = new javax.swing.JButton(”Browse”);
browse_btn.addActionListener(new Aksi() );
search_btn = new javax.swing.JButton(”Search”);
search_btn.addActionListener(new Aksi() );
reset_btn = new javax.swing.JButton(”Reset”);
reset_btn.addActionListener(new Aksi() );
browse_text = new javax.swing.JTextField();
browse_text.setForeground(java.awt.Color.BLACK);
browse_text.setEnabled(false);
search_text = new javax.swing.JTextField();
area_search = new javax.swing.JTextArea();
area_search.setEditable(false);
pane_area = new javax.swing.JScrollPane(area_search);
tread = java.util.concurrent.Executors.newCachedThreadPool();
panel = new PanelFind(this);
add(panel);
setLocation(200,200);
pack();
setResizable(false);
setDefaultCloseOperation(javax.swing.JFrame.EXIT_ON_CLOSE);
}
public void browse(){
int valid = browse.showOpenDialog(this);
if(valid == javax.swing.JFileChooser.APPROVE_OPTION){
dir = browse.getSelectedFile();
browse_text.setText(dir.getPath());
}else{
return ;
}
}
public void search(){
keyword = search_text.getText();
area_search.setText(”");
if(keyword.length()<1){ dir ="=" findnow =" new" ex =" java.util.concurrent.Executors.newCachedThreadPool();">
public void reset(){
keyword = “”;
dir = null;
search_text.setText(”");
browse_text.setText(”");
area_search.setText(”");
}
public static void main (String[] args) {
FindFiles baru = new FindFiles();
baru.setVisible(true);
}
private class Aksi implements java.awt.event.ActionListener{
public void actionPerformed(java.awt.event.ActionEvent event){
String command = event.getActionCommand();
if(command.equals(”Browse”)){
browse();
}else if(command.equals(”Reset”)){
reset();
}else if(command.equals(”Search”)){
search();
}
}
}
private class PanelFind extends javax.swing.JPanel{
private javax.swing.JFrame parent;
private java.awt.GridBagLayout layout;
private java.awt.GridBagConstraints constrait;
public PanelFind(javax.swing.JFrame parent){
this.parent = parent;
layout = new java.awt.GridBagLayout();
constrait = new java.awt.GridBagConstraints();
constrait.insets = new java.awt.Insets(5,5,5,5);
constrait.fill = java.awt.GridBagConstraints.BOTH;
setLayout(layout);
addComp(browse_text,0,0,2,1,0,0);
addComp(browse_btn,2,0,1,1,0,0);
addComp(search_text,0,1,1,1,200,0);
addComp(reset_btn,1,1,1,1,0,0);
addComp(search_btn,2,1,1,1,0,0);
addComp(pane_area,0,2,3,1,0,400);
}
public void addComp(javax.swing.JComponent comp, int kolom, int baris, int lebar, int tinggi, int lebarmanual, int tinggimanual){
constrait.gridx = kolom;
constrait.gridy = baris;
constrait.gridwidth = lebar;
constrait.gridheight = tinggi;
constrait.ipadx = lebarmanual;
constrait.ipady = tinggimanual;
layout.setConstraints(comp, constrait);
add(comp);
}
}
private class RunFind implements Runnable{
private String key;
private int count;
private FindFiles parent;
public RunFind(FindFiles parent){
this.key = keyword.startsWith(”.”) ? keyword : “.”+keyword;
this.count = 0;
this.parent = parent;
}
public synchronized void AddFiletoArea(java.io.File folder){
if(folder.isDirectory()){
java.io.File[] files = folder.listFiles();
for(java.io.File i : files){
AddFiletoArea(i);
try{
Thread.sleep(1);
}catch(InterruptedException e){
}
}
}else{
if(folder.getName().toUpperCase().endsWith(key.toUpperCase())){
area_search.append(folder.getPath()+”\n”);
count += 1;
}
}
}
public void run(){
parent.setEnabled(false);
java.io.File[] files = dir.listFiles();
for(java.io.File i : files){
AddFiletoArea(i);
try{
Thread.sleep(1);
}catch(InterruptedException e){
}
}
area_search.append(”—-FINISH—-\n”);
area_search.append(”There Are “+count+” Files Found”);
parent.setEnabled(true);
}
}
}
Read More...
Step One - Creating a project
Start by loading the Borland JBuilder tool. JBuilder remembers the most recent project you've worked on, and automatically opens it for you. Since we're creating a new project, however, we need to close it and create a new project.
- From the 'File' menu, select the 'Close All' menu option.
- From the 'File' menu, select the 'New Project' menu option
JBuilder will now display a Project Wizard. This wizard will ask you for information about your project, and then generate a project file for you.
- Enter as the file name for your project "MyFirstProject.jpr". It's best to place projects in their own directories. You can also click the browse button to use a file selection dialog box.
- Enter as a title 'My First Project', your name, and a brief description.
- Click 'finish'.
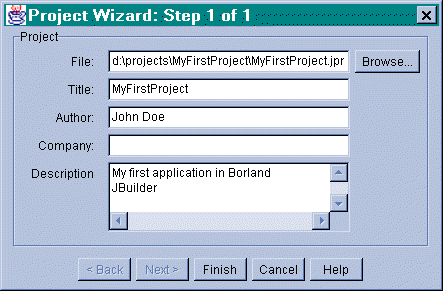
Figure 1.0 - Project Wizard prompts you for details about your project
Step Two - Creating a source file
Once you've created a project, you can begin to write your first Java application. The project view allows you to manage your project's files. You can select a file, and edit it, or you can add/remove files using the 'Add to project' and 'Remove from project' buttons. These can be easily recognised by the plus and minus signs on these buttons.
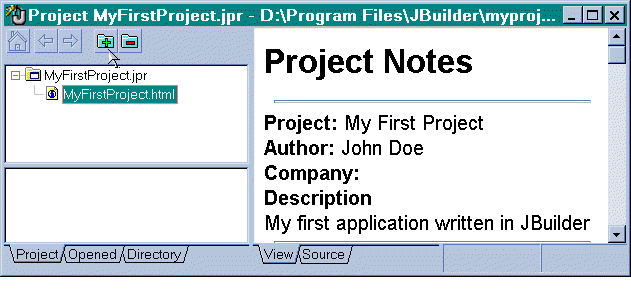
Figure 2.0 - Project view allows you to select, add and remove files
To write an application, we'll need to create a new source file, which we'll call "HelloWorld.java".
- Click on the 'Add to project button' (the blue folder with a green plus icon).
- As a filename, use 'HelloWorld.java'.
- Click on the 'Open' button to create the file.
Step Three - Writing your first application
Up until now, we haven't had to write any code. Now its time to get your hands dirty. Start by typing the following code into the "HelloWorld.java" file from Step Two.
package MyFirstProject;

public class HelloWorld
{
     public static void main(String args[]) throws Exception
     {
            System.out.println ("Hello world!");
            System.in.read();
     }
}
Don't worry if you're a little unsure about what the code does. We'll examine the code line by line.
1: package MyFirstProject;
This line states that the class belongs to the package MyFirstProject. A package is a collection of Java classes and interfaces. We group logically related code together in a package. As a general rule, each application should have its own unique package. Use the same name for your package as you do for your project.
2: public class HelloWorld
This line declares a new class, called "HelloWorld", and that it is publicly accessible. A class is composed of data variables (members), and functions (methods).
3: public static void main(String args[]) throws IOException
All applications written in Java share at least one thing in common - they all have a main method. You must declare a public static main method that accepts command line parameters (args), for your application to run. Our main method also declares that it could generate an I/O error when reading input from the user.
4: System.out.println ("Hello world!");
This is where our application writes a message to the user. System.out is an object that allows us to write to "standard output", which is the user's console.
5: System.in.read();
So that you can read the message before the application terminates, we need to wait for keyboard input. System.in is an object that allows us to read from "standard input", which is the sequence of characters entered by the user.
Step Four - Compiling the application
Before you can run an application, you must first compile it. A compiler takes source code (the instructions for a program), and converts it into executable instructions (a program that can be run). We'll compile the HelloWorld application now.
- From the 'Build' menu, select the 'Make "HelloWorld.java" menu item.
If you've typed in the code correctly, your application will now be ready to run. If not, carefully check your code again, and repeat.
Step Five - Running the application
Once the application is compiled, its ready to run. JBuilder runs applications in their own window, which you'll see in a moment.
- From the 'Run' menu, select the 'Run "HelloWorld" menu item, or use the shortcut of shift-F9
The HelloWorld application will then appear in a new window. You'll see the message "Hello World!", and the program will wait patiently until you press the
Summary
At the conclusion of this lesson, you should be able to do the following :-
- Create a new project
- Add files to your project
- Write code to send messages to standard output
- Compile code
- Execute compiled code
Source : http://www.javacoffeebreak.com/tutorials/jbuilder/lesson01/index.html
Read More...
When loading images over a network, a common problem which Java applets face is images not loading properly. On a fast network connection the image will load quickly, but over a slow modem or network connection, images take longer, or may not arrive at all. Users may be confused by blank images - particularly when a sequence of images are being displayed. One simple way to let your users know you're still loading is to use MediaTracker, which allows applets to detect when images are loaded. By David Reilly.
Ask any user who is connected via a modem dial-up connection, what they think about applets, and the answer is frequently that they are slow to load. As one user puts it, "I hate the ugly gray applet box that sits there on the page". Quite often, an applet is loading images for some form of animation - but the user doesn't know what is going on. Other times, applets that fail to load properly just sit there with a blank gray box. This adds to the confusion, because a slow loading applet is often equated with a broken one.
When writing applets, we as programmers have a responsibility to users to let them know what's going on. If your applet loads images over a network connection, it's important to track their progress, and notify the user.
"I hate the ugly gray applet box that sits there on the page.
That's where MediaTracker comes in. MediaTracker allows applets to check to see whether an image has loaded or not. Applets can register images with a MediaTracker object, and then wait until one or all images have loaded. While the images are loading, a message can be displayed to the user. When all the images are loaded, they can then be processed by the applet - for example, displayed as part of an animation. Note though MediaTracker can benefit applications, as well as applets - even when loading from a local file-system, there can be a noticeable delay when many large images are loaded.
MediaTracker is a class in the AWT package. If you're already working with images, the AWT package will be imported. If not, you'll need to add the following lines to the beginning of your code :-
// Import the AWT graphics package
import java.awt.*;
Next, you need to create an instance of java.awt.MediaTracker. You must pass an instance of java.awt.Component to MediaTracker's constructor. An applet is a subclass of Component, so when writing an applet for a web-page, the applet can pass itself by using the this keyword.
// Create a MediaTracker instance,
// to montior loading of images
tracker = new MediaTracker(this);
Once you have a MediaTracker, simply load each image and register it, using the MediaTracker.addImage (Image, int) method. It takes as its first parameter an image, and the idcode of the image as its second parameter. The idcode can be used to inquire about the status of a particular image, rather than a group of images.
// Load the image
Image img = getImage( getDocumentBase(),
"picture.jpg" );
// Register it with media tracker
tracker.addImage(img, 1);
Once you've registered the image, you can display a text message, or a simple animation, to let your users know that data is loading. Of course, you'll also have to check to see if the images are ready for use, by querying MediaTracker.
There are two ways to check on the progress of images. The first is to continually poll MediaTracker, by using the MediaTracker.checkID(int) method.
// Check to see if it has loaded
if (tracker.checkID(1) == false)
{
// Not yet, display message .....
}
else
{
// Display the animation
}
Another way, and often the simpler, is to just wait indefinitely, until all images are loaded. Note that it's best to do this in a separate thread of execution, so that your applet can continue to respond to user events and display a message. This is a blocking operation, whereas the MediaTracker.checkID(int) method is non-blocking and returns immediately.
// Wait until all images have loaded
tracker.waitForAll();
An example applet using MediaTracker
The following example demonstrates the use of MediaTracker. No images will be loaded until you click on the applet. Depending on the speed of your connection, it may take a few seconds, or even a minute to load the images. Note that the applet displays a message, indicating a load is occurring, and that the message disappears once the load is finished. Without MediaTracker, there'd be no way to tell if the image was completely loaded - you might end up seeing only part of the image until it was completely finished.
Read More...
Here is a sample program that shows the functionality of these :
- Create a new NetBeans project
- Add a JFrame Form
- Complete with two fruit labels, 2 pieces textfield (txtIPAddress and txtNamaHost) and three fruit Button (btnCheckIPAddress, btnCheckHostName and btnCheckLokal). See examples in the following figures :

- Type the following code on btnCheckHostName, event actionPerformed :
01privatevoidbtnCheckHostNameActionPerformed(java.awt.event.ActionEvent evt) {02try{03String strHostName = InetAddress.getByName(txtIPAddress.getText()).getHostName();04JOptionPane.showMessageDialog(null,"Host name dari IP Address '"+ txtIPAddress.getText() +"' = "+ strHostName);05}catch(UnknownHostException ex) {06JOptionPane.showMessageDialog(null, ex);07Logger.getLogger(frmIpAddress.class.getName()).log(Level.SEVERE,null, ex);0809}1011} - Perform the necessary import libraries (import java.net.InetAddress; import javax.swing.JOptionPane;)
- Type the following code on btnCheckIPAddress, event actionPerformed :
01privatevoidbtnCheckIPAddressActionPerformed(java.awt.event.ActionEvent evt) {0203try{04String strIPAddress = InetAddress.getByName(txtHostName.getText()).getHostAddress() ;05JOptionPane.showMessageDialog(null,"Alamat IP dari '"+txtHostName.getText() +"' ="+ strIPAddress);06}catch(UnknownHostException ex) {07JOptionPane.showMessageDialog(null, ex);08Logger.getLogger(frmIpAddress.class.getName()).log(Level.SEVERE,null, ex);0910}11} - Type the following code in the actionPerformed event btnCheckLokal :
01privatevoidbtnCheckLocalActionPerformed(java.awt.event.ActionEvent evt) {02try{03InetAddress AlamatInternet = InetAddress.getLocalHost();04JOptionPane.showMessageDialog(null,"Host name lokal : "+AlamatInternet.getHostName());05JOptionPane.showMessageDialog(null,"IP Address lokal : "+AlamatInternet.getHostAddress() );06}catch(UnknownHostException ex) {07JOptionPane.showMessageDialog(null, ex);08Logger.getLogger(frmIpAddress.class.getName()).log(Level.SEVERE,null, ex);0910}11} - Save and run the application (SHIFT + F6). Enter the IP Address and click on "Check Host Name" or enter the host name and click "Check IP Address". Check Local Host IP and not require an entry. Here are some screenshots of messages that appear :


Read More...
We can try to connect to the MySQL database through Java. To do this, please do the tutorial as follows:
- Installing the MySQL database server. To install the MySQL database on OpenSUSE please refer to the guidelines http://www.vavai.com/index.php?/categories/7-Migrasi-Database
- Running service MySQL with YAST | SYSTEM | SYSTEM SERVICE (RUNLEVEl)
- Download the MySQL Connector J through http://www.mysql.com/products/connector/j/ address. Grab the latest version. At the time this guide was written, the latest version is mysql-connector-java-5.1.5
- Extract the downloaded file and grab the file mysql-connector-java-5.1.5-bin.jar. Customize with downloadable versions of MySQL Connector.
- Copy these jar files to the location of the library. For compatibility with my other guides, please copy it to the folder / opt/jdk1.6.0/lib
- Open konsole and type the command..
- export CLASSPATH =.: / opt/jdk1.6.0/lib/mysql-connector
- For convenience, the command above can enter into the files. Bash_profile in their respective home folders
- Open Netbeans and type the following program code :
public class TestMysql { public static void main(String args)
try {
/* Test loading driver */
String driver = "com.mysql.jdbc.Driver";
Class.forName( driver );
System.out.println( "OK" );/* Test the connection */
String url = "jdbc:mysql://localhost/test";
java.sql.DriverManager.getConnection( url, "guest", "");
System.out.println( "OK" );
}
catch( Exception x ) {
x.printStackTrace();
}}}
Save with name TestMysql.java, then open Console(ALT + F2), Compile javac TestMysql.java If no error message, continue to run the program java TestMysql, and this is the Screen Out :

*Note:
The above program uses a local MySQL database server (localhost) with the test database, guest user name and password blank. These settings are the default settings and there is always at MySQL. If you want to modify, adjust the condition of your MySQL settings.
- java: command not found, it is usually not correct PATH settings. Try a test by running the command echo $ PATH on the console, and whether the response indicates the location of the installed JDK
- TestMysql class is public, Should be declared in a file named TestMysql.java. Occurs if the filename is different from the name of the class. Remember that Java adheres case sensitive, so different from the testmysql TestMysql
- Cannot resolve symbol
- Exception in thread "main" java.lang.NoClassDefFoundError: TestMysql, usually occur because of running the class files with the extension. Java should TestMysql, not java or TestMysql.class TestMysql.java
More and more exercise, we will be more accustomed and more know what is stipulated in the existing error message.


